Showing posts with label Photo tips. Show all posts

How to save an image on the web to your Camera Roll

How to save an image on the web to your iPhone Camera Roll  iPhone tip: How to save an image on the web to your Camera Roll (reader mail)Angela writes: Once in awhile I’ll come across a picture on the Internet that I’d like to copy and paste into my iPhone’s photo album. I know how to copy & paste text, but what about photos (or can you)?
Hi Angela! Good question—and yes, you can copy images from your iPhone’s web browser to the Camera Roll, or even send a web photo via email or picture message. The secret? A simple tap & hold.

Copy and paste an image to iMessage 200x300 iPhone tip: How to save an image on the web to your Camera Roll (reader mail)
Once you've copied a photo from the web, you can paste it into a picture message or an email.

Got your fingertip ready?

  • In the iPhone’s mobile Safari browser, tap and hold the photo or image you’d like to save.
  • In a second or so, a window with three buttons—”Save Image,” “Copy,” and “Cancel”—will pop up. Go ahead and tap “Save Image.”
  • Go back to the iPhone’s home page, then tap Photos, Camera Roll; the image you just saved should be sitting right here.
  • Next, try this: go back to the image on the web, tap and hold it, then tap the “Copy” button.
  • Return to the main iPhone menu, tap Messages, pick a lucky friend to send your image to, tap and hold the blank where your message goes, and tap “Paste” when the button appears.
  • Presto—the image should pop into the dialog box. Tap “Send” to deliver the photo to your pal via picture message.
Note: This tip also works on the iPad and iPod Touch.

How to crop and edit your photos in iPhone

How to crop and edit photos on your iPhone iPhone tip: How to crop and edit your photosYou just snapped the perfect family photo on your iPhone—well, almost perfect, save for that stranger lurking in the background.
Well, guess what? You don’t need a PC to crop that interloper out of the image. Instead, you can crop and polish your snapshot right on your iPhone (or iPad, for that matter).
iPhone photo editing tools 200x300 iPhone tip: How to crop and edit your photos
The iPhone has four editing tools (located at the bottom of the screen): rotate, auto-enhance, red-eye reduction, and crop.

Here’s how:
  • Tap the Photos icon on the home screen to access your photo albums; the most recent photos you shot will be sitting on the Camera Roll.
  • Tap a photo you want to edit, then tap the Edit button in the top-right corner of the screen.
  • You should now see four new icons at the bottom of the photo: a curved arrow, for rotating the image; a little magic wand, for “auto-enhancing” the colors and brightness; a red circle with a slash through it, for curing cases of red-eye; and a cropping tool for re-framing the image.
  • So, want to do a little cropping? Tap the crop icon, then drag the edges of the grid that appears; tap the Constrain button to set a specific aspect ratio (like 4 by 6) for the frame. You can also zoom in and turn the image any way you want by “pinching” the screen with your fingertips. All done? Tap the yellow Crop button, then tap Save.
  • Want to undo any of your changes, even after you’ve saved your edits? Just tap the Edit button again, tap (for instance) Crop, and drag the edges of the grid back to the original edges of the frame; you can also tap the auto-enhance or red-eye reduction icons to turn those effects off. Keep in mind, though, that you can only “undo” your edits while your photos are still on your iPhone.

Bonus tip


There are, of course, dozens of photo-editing apps with more advanced features (such as precise white-balance and color controls, photo filters, custom frames, “noise” reduction, and more) available in the App Store, including Apple’s own iPhone app ($5), the wildly popular Instagram (free), Adobe Photoshop Express (free), and my personal favorite, Camera+ (99 cents).

How to save your Photo Stream snapshots before they’re deleted

Photo Stream saving How to save your Photo Stream snapshots before theyre deleted (reader mail) 
Liz writes: So I turned on Photo Stream on my iPhone and it’s filling up with pictures, but I read that the photos in my Photo Stream get deleted after 30 days. What’s the best way to save them before they get deleted?
Hi Liz! Yes, you’re right: the pictures in your Photo Stream will be deleted from your iCloud account after 30 days, while your iPhone, iPad, or iPod Touch will only keep the latest 1,000 Photo Stream snapshots.
The good news, though, is that saving your Photo Stream images forever is easy—and in some cases, it even happens automatically.

So, here’s the first thing to keep in mind: whenever you take a photo with your iPhone, iPad, or iPod Touch, your snapshot is saved not only to your Photo Stream but also to the Camera Roll—and the pictures in your Camera Roll never get delated, or at least not until you tap the “Delete” button. In other words, if you take a picture on your iPhone, it’ll stay on your iPhone until you manually delete it.
OK, but what if you’re sharing Photo Stream with your significant other and you want to save the snapshots that he took on his iPhone? Here’s how:
  1. Open the Photos app on your iPhone, iPad, or iPod Touch, then tap Photo Stream.
  2. See the little square with the arrow in the top-right corner of the screen? Tap it, then start tapping the photos you’d like to save on your device.
  3. When you’re finished selecting photos, tap the Save button to save them to your Camera Roll, or tap Add To to save them to a new or existing photo album.
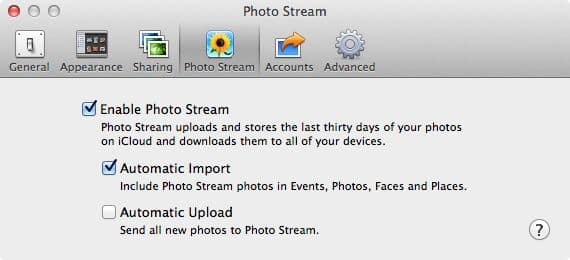
Photo Stream preferences in iPhoto 300x136 How to save your Photo Stream snapshots before theyre deleted (reader mail)
Just enable Photo Stream in iPhoto to automatically save all your Photo Stream images to your Mac.

And one more thing: if you’re using Photo Stream with iPhoto on your Mac or the iCloud control panel for Windows, all your Photo Stream pictures will be saved automatically—and permanently—to your system’s hard drive.
For iPhoto, you’ll need to turn on Photo Stream sharing by clicking the iPhone menu at the top of the screen; then, select Preferences, click the Photo Stream tab, and check the boxes next to “Enable Photo Stream” and “Automatic Import.”
(Note: I don’t recommend checking the “Automatic Upload” box, since that entails uploading to Photo Stream each and every new photo you import into iPhoto—meaning you could tie up your broadband connection for hours the next time you import, say, a couple hundred high-resolution pictures from your digital camera.)
For Windows users, just download, install, and launch the free iCloud control panel, check the box next to Photo Stream, then select the directory into which you’d like your Photo Stream images to be automatically downloaded.

Original Post: http://heresthethingblog.com/2011/11/28/save-photo-stream-snapshots-theyre/

How to turn your iPad into a digital picture frame

How to turn iPad into a digital photo frame How to turn your iPad into a digital picture frameWith a single tap, you can launch a slideshow on your iPad that pulls pictures from any photo album you choose.
The secret? A little button in the bottom-right corner of the iPad’s “lock” screen. Tap the button, and your slideshow will begin—perfect for turning your iPad into an instant digital photo frame on your desk.
iPad photo frame buttons 300x222 How to turn your iPad into a digital picture frame
Just press the photo frame button to launch a slideshow from the iPad’s lock screen.

Don’t see the photo frame button? Here’s a question: Did you set a passcode for the iPad’s lock screen? If so, you’ll need to tweak a setting to make the photo frame button appear:
  • Tap the Settings icon from the iPad home screen, tap General in the left-hand column, then tap Passcode Lock.
  • Once you’ve entered your passcode, switch the Picture Frame setting to “On.” Keep in mind, though, that with the picture frame button enabled, anyone will be able to start a slideshow on your iPad, even if they don’t know your iPad’s passcode.
Want to change the settings for your iPad slideshows? Just go to the Settings menu and tap Photo Frame in the left-hand column.
From here, you can switch from a normal “dissolve” between your photos to the snazzier “origami” transition, which makes your snapshots flip open and unfold in an appropriately eye-catching fashion.
You can also choose how long you’d like each photo to be displayed (anywhere from two to 20 seconds), whether you’d like your snapshots shuffled or displayed in order, and pick a specific photo album or “face” for your slideshow.
Had enough of the photo frame action? Tap the iPad’s screen, then tap the photo frame button again to return to the standard iPad lock screen.